Opening a keg properly is crucial for serving fresh, high-quality draft beer. Whether you're hosting a party, running an event, or just enjoying a keg at home, knowing the correct way to tap and pour beer ensures a smooth experience. This guide will walk you through how to open a keg, covering everything from preparation to troubleshooting common issues.
Preparing to Open a Keg
Identify the Right Coupler System
Different kegs require different types of couplers. The most common coupler types include:
- D-Type (American Sankey): Used for most American beers.
- S-Type (European Sankey): Used for European brands like Heineken and Stella Artois.
- A, G, and M Types: Used for specific European and specialty beers.
Chill the Keg Properly
- Keeping the keg cold (34–38°F or 1–3°C) prevents excessive foam.
- Refrigerate the keg for at least 24 hours before tapping.
- If refrigeration isn’t available, place the keg in a bucket of ice and water for several hours.

How To Tap a Keg of Beer
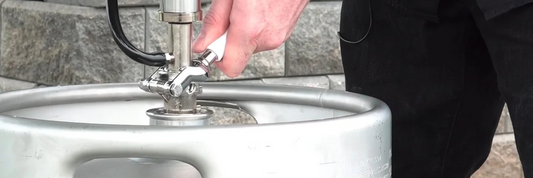
Step 1: Lift the Coupler Handle
- Ensure the keg is upright and stable.
- Lift the handle of the coupler to the “OFF” position.
Step 2: Attach the Coupler to the Keg
- Align the coupler with the valve opening on the top of the keg.
- Twist the coupler clockwise until it locks into place.
Step 3: Engage the Coupler
- Push the handle down to the “ON” position to activate the beer flow.
- You should hear a small hiss as the seal engages.
Step 4: Connect the CO₂ Tank (If Needed)
- If using a kegerator or draft system, attach the CO₂ regulator to pressurize the keg.
- Set the pressure between 10-12 PSI for standard kegs.
Step 5: Pour the Beer
- Hold the glass at a 45-degree angle while pouring.
- Once the glass is halfway full, tilt it upright for a smooth pour with minimal foam.

How to Open a Mini Keg
Mini kegs typically come with an easy-to-use built-in tap system.
Step 1: Remove the Seal
- Check for a plastic or metal seal on the top of the keg and remove it.
Step 2: Open the Vent
- Most mini kegs have a small vent tab or valve at the top. Open this to allow airflow.
Step 3: Pull Out the Tap and Pour
- Locate the built-in spout at the bottom and extend it outward.
- Press the tap to begin pouring.
How to Open a Corny Keg (Homebrew Keg)
Step 1: Release Pressure
- Pull the pressure relief valve on top of the keg to release any excess CO₂.
Step 2: Unlock the Lid
- Twist the lid handle and remove it.
Step 3: Connect the Gas and Liquid Lines
- Attach the gas (CO₂) line to the gas post and the liquid line to the beer post.
- Set the CO₂ pressure to 8-12 PSI.
Step 4: Pour and Enjoy
- Open the faucet and pour your fresh homebrew.
Tips for the Best Experience
Avoid Excessive Foam
- Always chill the keg before tapping.
- Keep the glass at an angle when pouring.
- Set CO₂ pressure correctly for draft systems.
Store the Keg Properly
- If not finishing the keg in one session, keep it at refrigerator temperature.
- Sealed kegs can stay fresh for 6–8 weeks.
Clean the Keg and Tap System
- Rinse the coupler and tap lines after each use.
- Use a cleaning solution every few weeks to prevent bacterial buildup.
Common Problems and Solutions
| Problem | Cause | Solution |
|---|---|---|
| Beer is too foamy | Keg is too warm or pressure is too high | Chill keg, reduce CO₂ pressure |
| Beer won’t pour | Coupler not engaged properly or CO₂ tank empty | Check coupler and refill CO₂ |
| Beer tastes off | Dirty tap lines or old keg | Clean tap system and check expiration |
Conclusion
Opening and using a keg correctly ensures a great beer-drinking experience with minimal waste. Whether using a full-size keg, a mini keg, or a Corny keg, following the right steps for tapping and pouring will help maintain the beer’s quality and taste. By chilling the keg properly, using the right equipment, and handling the beer carefully, you can enjoy a smooth and refreshing draft beer anytime.